ExportX Figma Plugin User Guide
Quick Start
Our plugin supports both “Design Mode” and “Dev Mode”. Check out the video below to quickly understand how to use the plugin.
Supported Export Formats and Compression Rates
We support compressing images in multiple formats and at multiple rates simultaneously, but the rules are limited to 5. The supported image formats are:
| Format | Supported | Space Saved |
|---|---|---|
| AVIF | Yes | ≈92% |
| WEBP | Yes | ≈88% |
| JPG | Yes | ≈85% |
| PNG | Yes | ≈68% |
| SVG | Yes | ≈8% |
| ico | 🚧 Under Development | - |
The compression effect is based on statistics, the actual effect may vary, and this table will be updated continuously.
History
The images compressed by the plugin will be permanently stored on your computer until you clear the cache or delete the history.
Due to client storage limitations, we only save 15 history records.
Free Image Hosting Service
ExportX provides you with a free image hosting service that allows for quick uploads. The service is built on Cloudflare’s free CDN, and we guarantee not to delete your images. This allows you to get an upload experience with zero configuration.
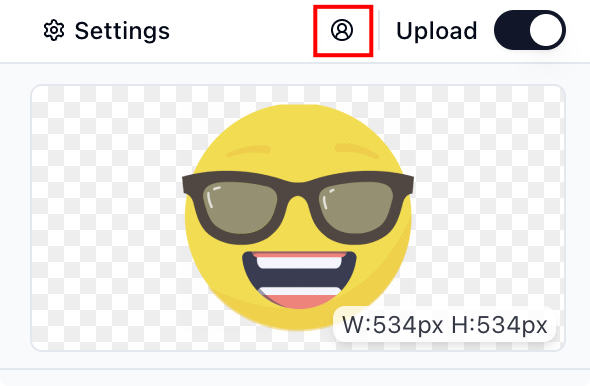
Turn on the switch in the upper right corner of the plugin to use our free image hosting service.
At this point, click the “ExportX” button to complete the compression and upload operation in one click. In the history record, click the copy button to get the image link.
You need to comply with our relevant agreement to use our free image hosting service.
Of course, we recommend that you use a custom upload service.
Custom Upload Service
If you have your own object storage service, you can replace it with your own upload interface. First, click [Settings] in the upper left corner, and select “Custom” in the upload settings.
Upload Interface Specification
After enabling custom upload, the image will be uploaded to your interface via a POST request. The interface needs to comply with the following specifications:
Request Content
Header: You can pass tokens and other information through custom headers.
Content-Type: multipart/form-data;
Body: The plugin uploads files in form-data format. The following parameters are provided by the plugin. At the same time, you can pass additional information through custom Body.
| Parameter Name | Type | Description |
|---|---|---|
| file | File | Binary file |
| fileName | String | File name, such as image92.avif |
| format | String | Image format, such as png |
| figmaName | String | Figma username, users can modify it in Figma, it is not unique but readable. |
| figmaId | String | Figma user ID, a 19-digit number, refer to Figma User |
| xid | String | Composite field, the format is figmaName@figmaId |
Response Content
You need to return a json object to the plugin, which contains the url of the image. The url is used to copy to the clipboard. If the url is not returned, the copy button will be unavailable.
{
  "url": "https://dev.cdn.abfree.com/images/6FjJoXmt34ox0Fu1.png"
}
Cloudflare R2+Worker
Sample code, here using hono for demonstration
import { Hono } from "hono";

type Bindings = {
  MY_BUCKET: R2Bucket;
  CDN_URL: string;
};

const app = new Hono<{
  Bindings: Bindings;
}>();

app.post("/upload", async (c) => {
  const key = genFileKey();
  const formData = await c.req.parseBody();
  const file = formData["file"];

  if (file instanceof File) {
    const fileBuffer = await file.arrayBuffer();
    const fullName = file.name;
    const ext = fullName.split(".").pop();
    const path = `images/${key}.${ext}`;

    let contentType = file.type;

    if (contentType === "image/svg") {
      contentType = "image/svg+xml";
    }

    console.log(file.type);
    await c.env.MY_BUCKET.put(path, fileBuffer, {
      httpMetadata: {
        contentType: contentType,
        contentDisposition: `inline`,
      },
    });
    return c.json({
      url: `${c.env.CDN_URL}/${path}`,
    });
  } else {
    return c.text("Invalid file", 400);
  }
});
Amazon S3 or S3 Compatible
Most object storage is compatible with the S3 protocol, such as
- AWS S3
- Cloudflare R2
- Google Cloud Storage
- Alibaba Cloud OSS
- Tencent Cloud COS
Sample code
// api.ts
import { Hono } from "hono";
import { uploadToS3 } from "./s3";

type Bindings = {
  CDN_URL: string;
};

const app = new Hono<{
  Bindings: Bindings;
}>();

app.post("/uploadS3", async (c) => {
  const key = genFileKey();
  const formData = await c.req.parseBody();
  const file = formData["file"];
  if (file instanceof File) {
    const fileBuffer = await file.arrayBuffer();
    const fullName = file.name;
    const ext = fullName.split(".").pop();
    const path = `images/${key}.${ext}`;
    let contentType = file.type;
    if (contentType === "image/svg") {
      contentType = "image/svg+xml";
    }
    const uint8Array = new Uint8Array(fileBuffer);
    await uploadToS3(c, {
      file: uint8Array,
      contentType,
      key: key,
    });
    return c.json({
      url: `${c.env.CDN_URL}/${path}`,
    });
  } else {
    return c.text("Invalid file", 400);
  }
});
// s3.ts
import { S3 } from "@aws-sdk/client-s3";
import { Context } from "hono";

let s3Client: S3;
interface UploadParams {
  file: Uint8Array;
  contentType: string;
  key: string;
}
export async function uploadToS3(c: Context, params: UploadParams) {
  const client = getClient(c);
  await client.putObject({
    Body: params.file,
    Bucket: c.env.S3_BUCKET,
    Key: params.key,
    ContentType: params.contentType,
  });
}
function getClient(c: Context) {
  if (s3Client) return s3Client;
  const { S3_ACCESS_KEY_ID, S3_SECRET_ACCESS_KEY, S3_ENDPOINT, S3_REGION } =
    c.env;
  s3Client = new S3({
    credentials: {
      accessKeyId: S3_ACCESS_KEY_ID,
      secretAccessKey: S3_SECRET_ACCESS_KEY,
    },
    endpoint: S3_ENDPOINT,
    region: S3_REGION,
  });
  return s3Client;
}
QA
How is the upload initiated?
To protect the privacy of your images, the upload action is initiated by the front end, so you may need to handle cross-domain issues.
How to avoid service abuse
In general, the upload service interface you fill in is publicly accessible. If the interface is leaked, this may lead to anonymous access or even abuse. Therefore, we suggest you use xid+secret whitelist to restrict access.
What is xid?
xid is a composite field of figmaId and figmaName, the format is figmaName@figmaId. It is included in the uploaded body, and you can verify this field in the interface to see if it is in the whitelist.
- figmaName, is the user’s name in Figma login information, users can modify it in Figma, it is not unique but readable.
- figmaId, a 19-digit number, is the unique identifier of the user in Figma login information.
You can refer to [Figma User]
xid is difficult to forge and is already secure enough, but if you need higher security, we suggest you add a secret field.
What is secret?
secret is a password you set yourself. You can generate it yourself and issue it to users. Users need to fill in this password in the Body when using the plugin.
Of course, this is just a suggestion, the specific security strategy needs to be formulated according to your actual situation.
How to troubleshoot upload errors
If you use Figma in your browser, you can check the Network or Console panel in the developer tools to see the upload request and return.
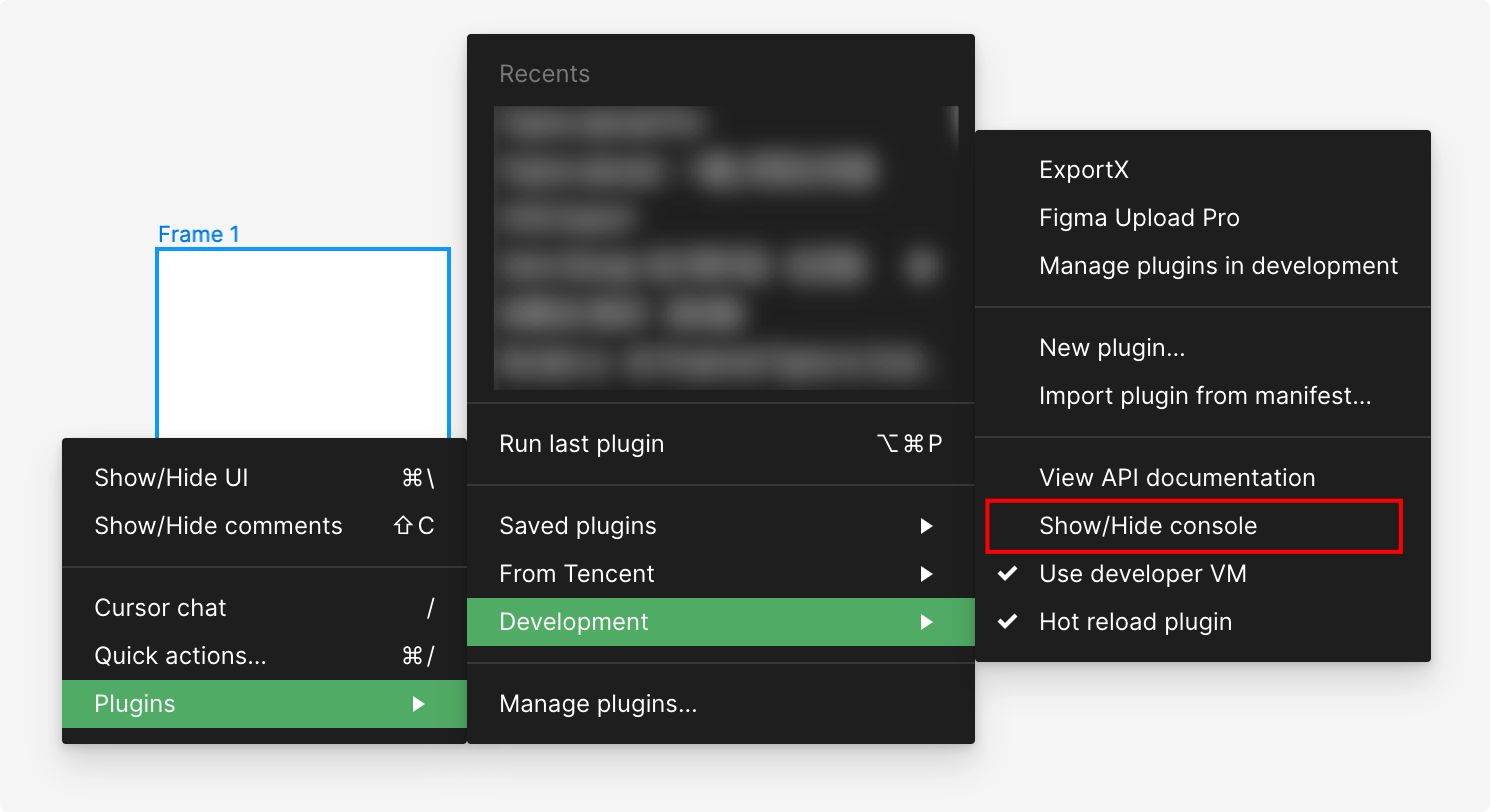
If you are using the Figma client, you can open the console to get error information according to the following prompts.
How to get my xid
On the plugin homepage, click the user button in the upper right corner, and you can see your xid.